How to Use Ahrefs Web Analytics with Shopify
As a marketing agency and official Shopify partner that serves small businesses across the country, we’re always looking for the best tools to help our e-commerce clients better understand and grow their web presence. One new tool on the market is Ahrefs Web Analytics, which is a free and simple alternative (or complement) to Google Analytics.
If you’re trying to install Ahrefs Web Analytics on a Shopify store, you may face different challenges, especially since no documentation currently exists on this implementation process.
In this article, I’ll walk you through the right way to install Ahrefs Web Analytics on Shopify, based on testing we conducted here at Igniting Business. Whether you're an e-commerce store owner or a digital marketer, this guide will help you avoid common tracking errors and get analytics data flowing into your Ahrefs Web Analytics dashboard.
Please note that Ahrefs support does not currently have documentation for implementing Ahrefs Web Analytics with Shopify. When we reached out to Ahrefs Support, we showed them how we successfully got web analytics to work on Shopify, and they confirmed that the data streaming in looked accurate. However, they did not want to officially comment on the accuracy of this post as they do not review external articles.
Table of Contents
- The Wrong Way to Implement Ahrefs Web Analytics: Using Shopify’s Pixel Interface
- The Right Way: Install Ahrefs within the <head> of Your Shopify Theme
- Step-by-Step Instructions for Installing Ahrefs Web Analytics on Shopify
- Why Use Ahrefs Web Analytics with Shopify?
- Import Past Google Analytics 4 (GA4) Data Into Ahrefs Web Analytics
- Additional Tool Recommendations for Shopify and Digital Marketing
The Wrong Way to Implement Ahrefs Web Analytics: Using Shopify’s Pixel Interface
Shopify offers a relatively new feature called Customer Events (Pixels) that allows you to add custom tracking scripts in a privacy-friendly way. This method also allows integrations with other Shopify Apps that control cookie consent and customer privacy utilities which is hugely beneficial.
Shopify is pushing all systems to integrate tracking via the pixel/customer event interface whenever possible.
While Shopify’s Customer Events (Pixels) works great for many platforms (like Facebook Pixel or Google Analytics), it does not currently play well with Ahrefs Web Analytics.
If you add Ahrefs via Shopify’s Pixel system, you might start seeing URLs like this show up in your reports:
/wpm@a7f637dfa7...209pe721/custom/web-pixel-.../pages/contact-us
Obviously, these aren’t accurate URLs. They’re sandboxed iframe paths created by Shopify’s pixel engine. While the Ahrefs script technically loads, it’s loading inside a sandbox, meaning it can’t parse the actual URL the user is visiting — which makes your analytics exceptionally hard to understand.
For now, Ahrefs Web Analytics cannot accurately leverage Shopify’s tracking pixel interface.
The Right Way: Install Ahrefs within the <head> of Your Shopify Theme
To track URLs and referrers accurately with Ahrefs Web Analytics, you need to install the Ahrefs tracking script directly in your theme’s <head> section, not through a pixel.
Because this implementation requires editing Liquid files, we do not recommend that business owners attempt it on their own unless they have substantial experience editing Liquid.
Instead, we highly recommend you work with a qualified Shopify web developer/Shopify partner for implementing any changes to your core code. You don’t have to hire a web development firm or marketing agency for ongoing services. Instead, you could use Shopify freelancer for this one-off task. We recommend leveraging a tool like StoreTasker or ShopExperts to get this implementation task affordably completed.
You can even supply the URL to this article to the Shopify expert to brief them on the implementation need.
Step-by-Step Instructions for Installing Ahrefs Web Analytics on Shopify
The following are step-by-step instructions for Installing Ahrefs Web Analytics on Shopify. We strongly recommend following each step precisely and taking backups before any action. Note that if you are not comfortable with editing liquid files, please contact a Shopify Partner or use a service like StoreTasker or ShopExperts to implement the changes.
1. Create and Download a Backup of Your Shopify Theme File
- First, you should create and download a backup of your theme. In Shopify, go to Online Store > Themes > Click the three dots, and select “download theme file.”
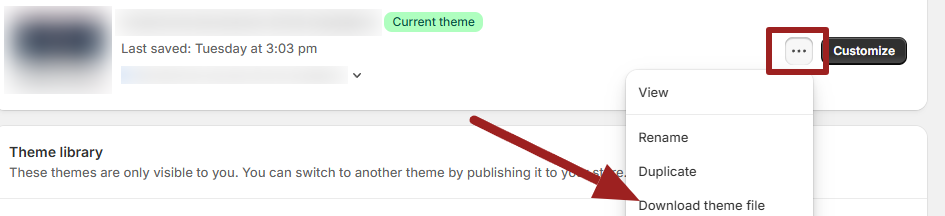
- Note the email address your backup will be sent to and click “Send email.”
- In your email, click on the theme file URL which should initiate the download. Note that it can take a few minutes to get the theme file backup generated.
- Save the theme file backup to a secure place in case you need to restore it.
2. Prep and Install the Ahrefs Web Analytics Snippet
To get access to Ahrefs Web Analytics, you’ll need to first sign up for an account here https://ahrefs.com/web-analytics or login to your existing Ahrefs Accounts.
- Under the Web Analytics tab, find the URL of the site you want to add and click “Set up Web Analytics.”
- Keep this window open as you’ll need to copy code from it in step 5.
- Within Shopify navigate back to Online Store > Themes > Click the three dots and select “Edit Code.”
- On the left-hand side, open the layout/theme.liquid file.
- Scroll to the end of the <head> section and paste the following code just before the closing </head> tag:
{% if request.host contains 'domain.com' %}
<script src="https://analytics.ahrefs.com/analytics.js" data-key="ENTERYOURKEY" async></script>
{% endif %} - Within the liquid code, complete the following updates:
- Replace domain.com with your own store’s domain.
- Replace ENTERYOURKEY with your unique data-key provided by Ahrefs Web Analytics (step 2).
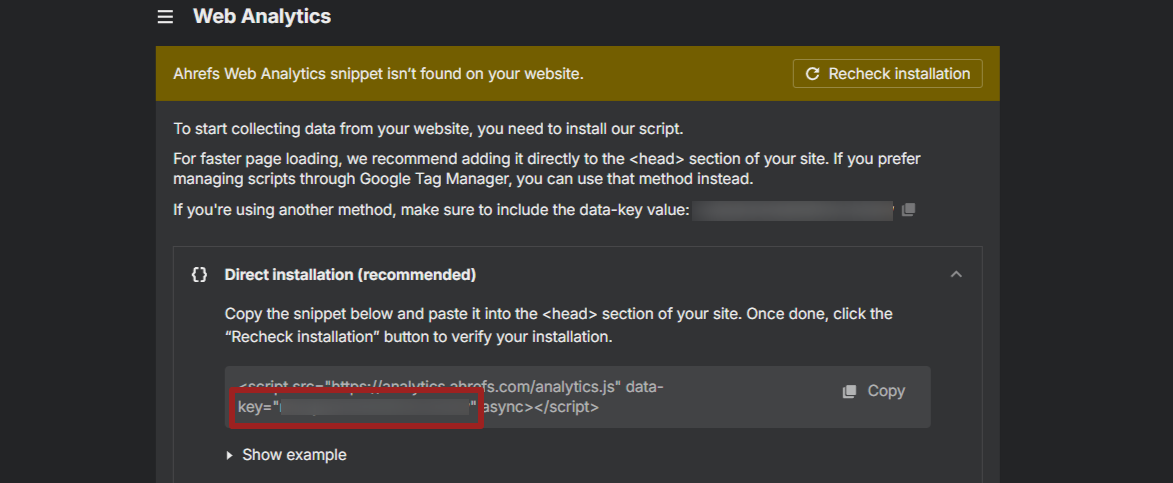
- Save the file.
- Within Ahrefs Web Analytics, click recheck installation. Note that it may take 5-15 minutes for Shopify to show the update on the front end of your website due to its page cache and CDN.
- Once Ahrefs Web Analytics says it’s successfully installed, click the “Save” button in Ahrefs Web Analytics.
That’s it! The Ahrefs script will now load on every page in the main browser context, where it can detect real page URLs and send clean, reliable data to your Ahrefs account.
3. Confirm Ahrefs Web Analytics Is Collecting Data from Shopify
To double-check that Ahrefs Web Analytics is working in Shopify, follow the steps below after installation:
- Visit your Shopify store and open your internet browser’s Developer Tools > Network tab.
- Reload any page and confirm that analytics.ahrefs.com/analytics.js is being loaded. If it’s being loaded successfully, that means you got the installation correct!
- If you don’t see analytics.ahrefs.com/analytics.js loading, I’d recommend waiting 15-30 minutes to see if it’s a caching issue and try again.
- Navigate back to https://app.ahrefs.com/dashboard?tab=webAnalytics and select your website. You should start seeing data appear.
- Note that referrer data tends to be delayed, so I’d check back an hour or two later for that specific section.
Why Use Ahrefs Web Analytics with Shopify?
Ahrefs is known for its powerful SEO research tools, but with Ahrefs Web Analytics, it adds real-time user behavior tracking to the mix. This gives you:
- Exceptionally easy-to-understand high-level reporting
- Organic traffic monitoring without the complexity of navigating Google Analytics 4 (GA4)
- Light, privacy-conscious tracking script
- Clean URL and referrer data for deeper insight into what’s driving traffic to your website (including specific AI and LLMs)
When installed properly, Ahrefs Web Analytics becomes a valuable extension of your SEO strategy, not just a traffic monitor, but a bridge between your off-site SEO and on-site behavior.
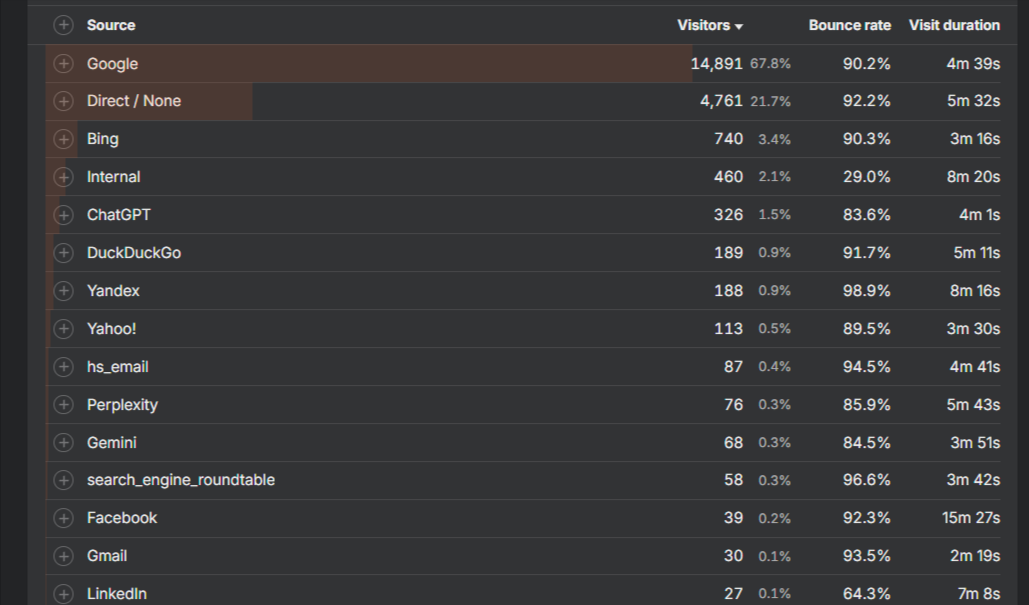 Ahrefs Web Analytics showing traffic sources, including LLMs/AI.
Note that we are not currently recommending Ahrefs Web Analytics as a full replacement for Google Analytics 4 (GA4). We ultimately recommend having both running on your site. Eventually, as Ahrefs builds more features into its analytics toolset, you may be able to consider replacing your existing Google Analytics.
Import Past Google Analytics 4 (GA4) Data Into Ahrefs Web Analytics
In December 2024, Ahrefs rolled out the ability to import Google Analytics 4 data directly into your Ahrefs Web Analytics. This is useful for backfilling old analytics data to display for the dates prior to when you installed Ahrefs Web Analytics on your website.
To enable this import, you simply need to have the Google Analytics account connected within your Ahrefs project settings. Note that on our account, at least, Ahrefs automatically imported the data given that we had previously connected our Google account. Learn more about how the Google Analytics 4 (GA4) data import works.
As with any data import feature between two unique systems, not all data will transfer. Additionally, Ahrefs may calculate certain information, like bounce rate, differently than Google's default systems.
It's highly recommended to use caution when importing data from one platform to another.
Additional Tool Recommendations for Shopify and Digital Marketing
At Igniting Business, we constantly evaluate how tools like Ahrefs can provide meaningful insights for our clients. While Shopify’s Pixel feature is helpful in many cases, tools like Ahrefs still require manual theme integration to function properly.
If you’d like to get more tips like these for free, consider subscribing to our free monthly newsletter packed full of web design, SEO, marketing, and Shopify tips.
If you need professional help, feel free to contact us. If we can’t help you directly, we’ll do our absolute best to refer you to someone who can help.
At no additional cost to you, we may receive a commission if you click on some of the links on this website and make a purchase.
